
Limewashing My Walls
- hornerkelsie
- Dec 28, 2023
- 2 min read

Limewashing…..Venetian plaster…. A little bit of both.
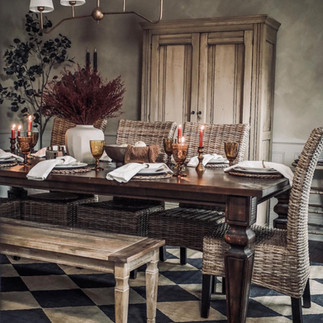
I wanted to give my walls, warmth and texture. I researched limewashing and Venetian plaster to death. Ultimately, I found a technique that worked using a little bit of both concepts.
There was a lot of trial and error, but I’m not going get into all that. I am just going to tell you what worked in the end.
First: I color drenched my dining room accessible beige. (Everything but the ceiling) I didn’t do this at first and the crown molding and waines cotting looked way too traditional with the textured walls- it wasn’t giving me the old world feel I wanted. (Swipe through to see all the photos)
Next, I used the venetian plaster. If you remember my stories a few weeks back, @hartville_hardware let me test out this product. They don’t even carry it yet!! We tinted it revere pewter at half strength. At first, I tried to use a trowel (which is what the pros do) and it was just way too messy and very difficult to control. So I decided to water down the product and paint in on with wide paint brush (1:1 ratio). I used “X” like brush strokes and worked my way through small sections. It is not meant to look perfect, so keep that in mind. Once I figured out my technique it was actually really really fun! I would let each coat dry completely and then go back and touchup areas that I didn’t like. Every time I added a new layer, I loved it even more. I repeated this step 2-3 times.
And that’s it.
I will say this was a pretty ambitious DIY project. I tried several different techniques and applications that didn’t work for me. But in the end, it ended up being really fun and I am absolutely obsessed with it! Swipe all the way to the end to see my inspo pic!
OK - in the comments let me know your questions! Do you love it or hate it??
Shout out to @tituskurtz for these amazing pictures!!!
#rinerevisions #limewashing #venetianplaster #hartvillehardware #diningroomvibes #oldworldcharm #oldworlddiningroom #accessiblebeige #checkeredrug #ratandiningchair #darkhardwoodfloors #akronohio #ohiodesigner


Comments